
The Dadan plugin for WordPress lets you embed Dadan videos on any page and add a record button that visitors click to send you a screen or camera recording. It works with the block editor, shortcodes and Elementor. This guide covers the download, the installation and the one-time connection to your Dadan account.
Version 2.1.3. Requires WordPress 6.6 or later and PHP 7.4 or later. Elementor 3.20 or later is optional.
Download the Dadan plugin for WordPress (dadan-wp-v2.1.3.zip, 126 KB)
What the plugin does
Link to section: What the plugin does| You want to | Use | Guide |
|---|---|---|
| Show a Dadan video on a page | The Dadan Video block, the | Embed Dadan videos in WordPress |
| Let visitors record their screen or camera and send you the video | The Dadan Record block, the | Add a Dadan record button to WordPress |
| Reuse the same recording settings across pages | Instances, under Dadan › Instances in WordPress | Add a Dadan record button to WordPress |
Both features use your Dadan account: video embeds need a Dadan Lite plan or above, and the record button needs the Lite, Pro or Business plan. Embedding uses the video’s share link. Recording also needs a public App ID from your Dadan account, which takes about two minutes to set up.
Before you start
Link to section: Before you start- WordPress 6.6 or later and PHP 7.4 or later. You can see both under Tools › Site Health › Info.
- An administrator account on the WordPress site, to install plugins and set the App ID.
- HTTPS on your site. Browsers only allow screen and camera recording on secure pages. Embeds work on any page.
- A Dadan account on the Lite, Pro or Business plan. Video embeds need Lite or above. The record button needs Lite, Pro or Business, which include public apps and the App ID. See Dadan plans and subscriptions.
- Elementor 3.20 or later, only if you build pages with Elementor. Blocks and shortcodes work without it.
Download the plugin
Link to section: Download the pluginDownload the plugin as a zip file. Do not unzip it: WordPress installs the zip as it is.
The zip contains one folder, dadan, which becomes wp-content/plugins/dadan on your site.
Remove the older Dadan plugins first
Link to section: Remove the older Dadan plugins firstVersion 2 replaces two older plugins, Dadan Video Embed and Dadan for Elementor. If your site has either of them:
- In WordPress, go to Plugins › Installed Plugins.
- Click Deactivate under the old Dadan plugin, then Delete.
- Repeat for the second one if it is there.
If you skip this step, WordPress can stop the upload with “Destination folder already exists”. After you install the new plugin, open the pages that used the old plugins and check that they still look right.
Install the plugin in WordPress
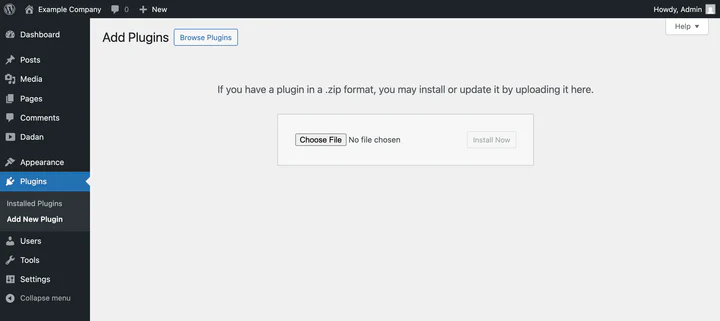
Link to section: Install the plugin in WordPress- Go to Plugins › Add New Plugin and click Upload Plugin at the top of the page.
- Click Choose File and select
dadan-wp-v2.1.3.zip. - Click Install Now.
- When WordPress says the plugin was installed, click Activate Plugin.
A Dadan item now appears in the WordPress admin menu, with a Dadan page and an Instances page under it.
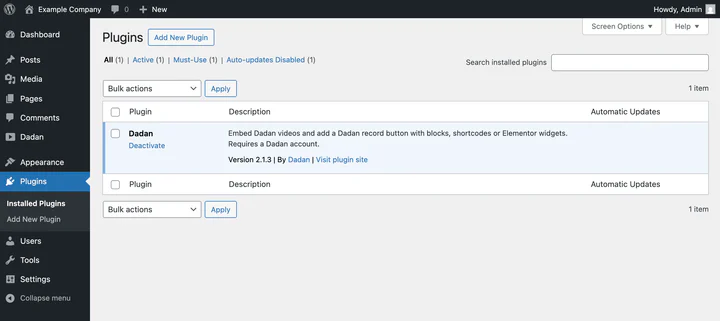
If you manage the site over FTP or SSH instead, unzip the file and copy the dadan folder to wp-content/plugins/, then activate Dadan under Plugins.
Connect the plugin to your Dadan account
Link to section: Connect the plugin to your Dadan accountYou only need this part to collect recordings. To embed videos, you can go straight to Embed Dadan videos in WordPress.
Open Dadan in the WordPress admin menu. The setup checklist shows the three steps and the exact address of your site.
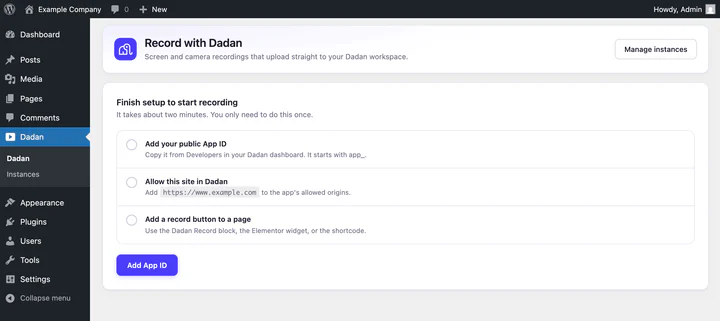
Step 1: create a public App ID in Dadan
Link to section: Step 1: create a public App ID in Dadan- In Dadan, open Account & Settings from the dropdown menu, then select Developers.
- In the Public Apps section, click Create Public App.
- Enter a name you will recognize, for example “Company website”.
- Under Allowed Origins, add your site’s origin and press Enter. Step 2 explains what to enter.
- Click Create, then copy the Public App ID. It starts with
app_.
The Record SDK overview describes every field on that screen, including the optional webhook.
Use the public App ID, never an API key. The App ID is safe to show in a browser. A secret API key is not, and the plugin refuses values that look like one.
Step 2: allow your site in Dadan
Link to section: Step 2: allow your site in DadanDadan only accepts recordings from the origins you list on the public app. Copy the origin from the plugin’s checklist, for example https://www.example.com, and add it under Allowed Origins.
An origin is the scheme and the host, without a path. https://example.com and https://www.example.com are two different origins. If visitors can reach your site at both, add both. Add your staging site too if you test there.
Step 3: paste the App ID in WordPress
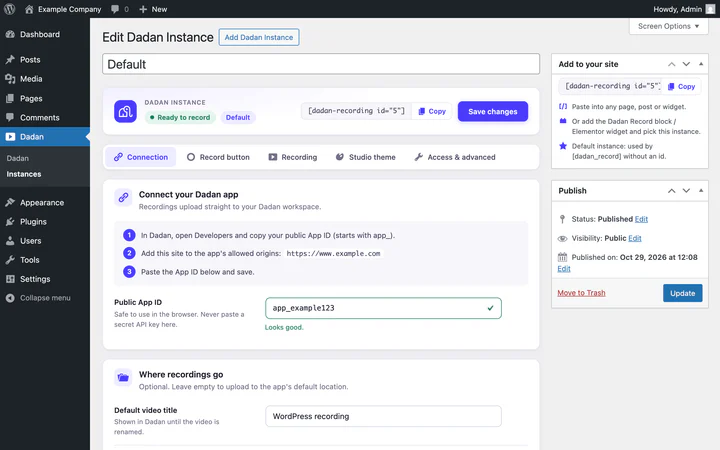
Link to section: Step 3: paste the App ID in WordPress- Go to Dadan › Instances and open Default. WordPress created it when you activated the plugin.
- On the Connection tab, paste the App ID into Public App ID. A check mark and “Looks good.” appear when the format is right.
- Click Save changes.
The header now shows Ready to record.
Check that the plugin is ready
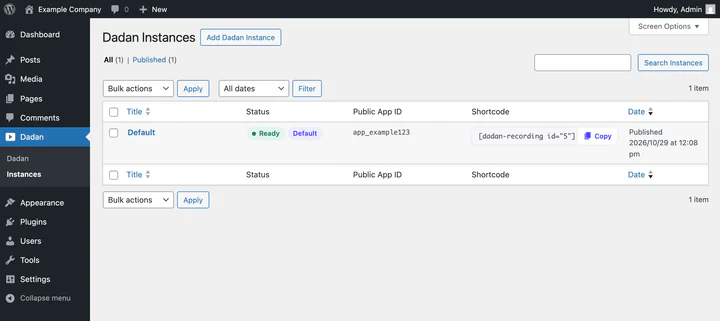
Link to section: Check that the plugin is readyGo to Dadan › Instances. The Default instance shows Ready in the Status column, with its shortcode next to it.
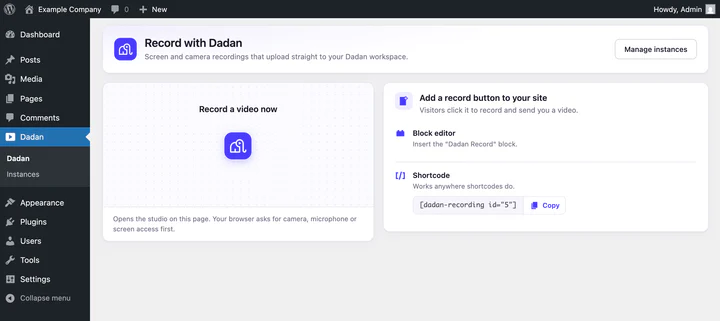
Then open the Dadan page and click the record button under Record a video now. Your browser asks for camera, microphone or screen access, and the recording studio opens. If it shows “Couldn’t start recording” instead, the origin from step 2 is missing or different: see Recording does not start.
Update the plugin
Link to section: Update the plugin- Download the new zip from this page.
- Go to Plugins › Add New Plugin › Upload Plugin, choose the zip and click Install Now.
- WordPress shows the installed version next to the uploaded one. Click Replace current with uploaded.
Your instances and settings are kept. Version 2.1.3 needs no settings migration.
Remove the plugin
Link to section: Remove the plugin- Deactivate keeps your instances and settings. Dadan blocks stop showing on your pages and shortcodes appear as plain text until you activate the plugin again.
- Delete also removes every instance and the plugin’s settings. Videos and recordings stay in your Dadan account.
Next steps
Link to section: Next steps- Embed Dadan videos in WordPress: blocks, shortcodes and Elementor.
- Add a Dadan record button to WordPress: instances, button style, recording options and who can record.
- Dadan WordPress plugin troubleshooting: error messages, missing buttons and privacy.
Frequently asked questions
Link to section: Frequently asked questionsIs the Dadan WordPress plugin free?
Link to section: Is the Dadan WordPress plugin free?The plugin is free to download and install. Embeds and recordings use your Dadan account: video embeds need a Dadan Lite plan or above, and collecting recordings needs the Lite, Pro or Business plan, which include public apps and the App ID.
Do I need Elementor?
Link to section: Do I need Elementor?No. The Dadan Video and Dadan Record blocks and the shortcodes work in any WordPress theme. If Elementor 3.20 or later is active, the plugin also adds matching Elementor widgets.
Does the plugin work with the classic editor?
Link to section: Does the plugin work with the classic editor?Yes. Use the and shortcodes in the classic editor, in widgets and anywhere else your theme runs shortcodes.
Where do recordings go?
Link to section: Where do recordings go?Recordings upload straight to the Dadan workspace that owns the public App ID. WordPress never stores the video. You can pick a folder or team per instance, as described in Where recordings go.
Is the App ID a secret?
Link to section: Is the App ID a secret?No. The public App ID is designed to appear in the browser, and the allowed origins stop other sites from using it. Never paste a secret API key into WordPress.
))

))