
A Dadan record button lets visitors record their screen, their camera or both, right on your WordPress site, and send you the video. Use it for support requests, bug reports, testimonials, job applications or feedback. Recordings upload straight to your Dadan workspace, never to WordPress.
Before you add a button, install the Dadan plugin and connect it with a public App ID. The Default instance must show Ready to record.
How recording works for visitors
Link to section: How recording works for visitors- A visitor clicks the record button on your page.
- The browser asks for access to the camera, the microphone or the screen.
- The Dadan recording studio opens on top of your page. The visitor picks a mode, records and clicks Done.
- The visitor reviews the take and uploads it. The video appears in your Dadan workspace.
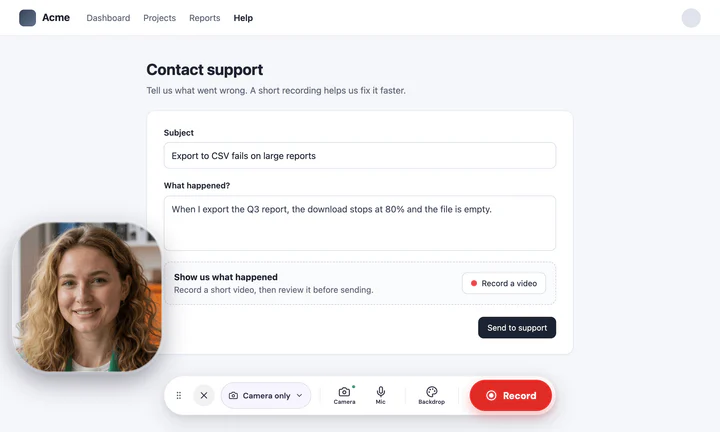
The plugin hides the button on phones by default, because mobile browsers do not support screen recording reliably. You can change that per instance.
Set up an instance
Link to section: Set up an instanceAn instance is a saved set of recording settings: the App ID, where recordings go, the look of the button, the recording options and who can record. Every block, shortcode and widget uses one instance, so you can change many buttons at once.
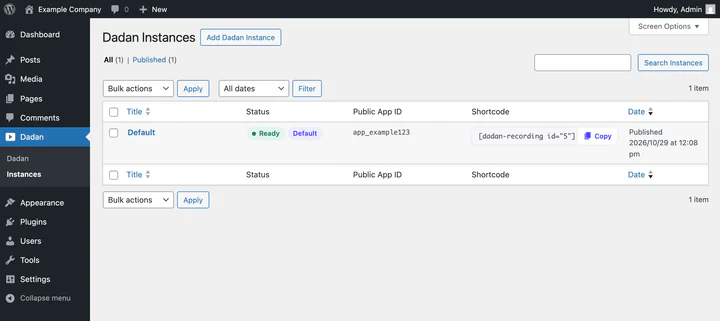
WordPress creates a Default instance when you activate the plugin. To use different settings on some pages, for example a different folder for job applications:
- Go to Dadan › Instances and click Add Dadan Instance.
- Enter a title, for example “Job applications”.
- On the Connection tab, paste the public App ID.
- Adjust the other tabs as described below and click Save changes.
Each instance has its own shortcode, shown in its header and in the instances list, for example . Only administrators can create and edit instances.
Choose where recordings go
Link to section: Choose where recordings goThe Connection tab has a Where recordings go section. All three fields are optional.
| Field | What it does |
|---|---|
| Default video title | The title new recordings get in Dadan, for example “Website recording” |
| Folder ID | Uploads recordings to this Dadan folder. Takes priority over Team ID |
| Team ID | Uploads recordings to this team. Ignored when a Folder ID is set |
Leave them empty to upload to the public app’s default location.
Add the record button to a page
Link to section: Add the record button to a pageWith the Dadan Record block
Link to section: With the Dadan Record block- Edit the page and click + (Block Inserter).
- Search for Dadan and choose Dadan Record.
- In the block settings, open Connection and pick the Instance. The notice “Connected through the Default instance.” confirms the connection.
- Save or update the page.
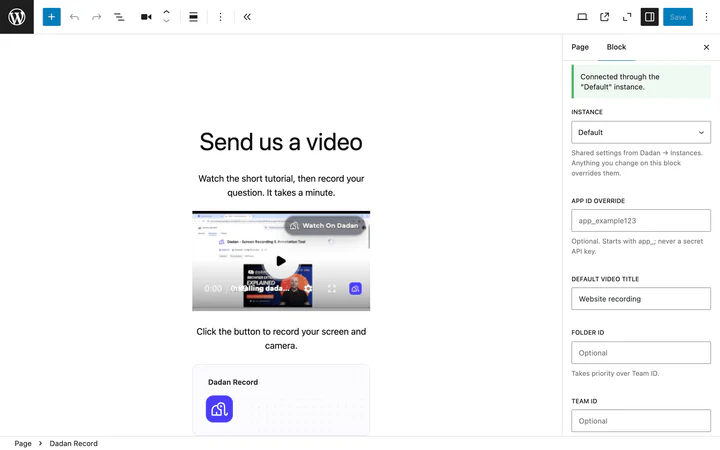
The block’s other panels (Record button, Recording, Studio theme and Access & advanced) match the instance tabs. Anything you change on the block overrides the instance for that block only. Administrators can also enter an App ID override to send that button’s recordings to a different Dadan app. For other users, the block always uses the instance’s App ID.
With a shortcode
Link to section: With a shortcodeCopy the shortcode from the instance and paste it into a page, a post, a widget or the classic editor:
[dadan-recording id="5"]With your own button text:
[dadan-recording id="5" label="Record a message"]| Attribute | Default | Notes |
|---|---|---|
id | The Default instance | The instance ID from Dadan › Instances |
label | The instance’s button label | The button text, also read by screen readers |
and work the same way. Without an id, they use the Default instance.
With Elementor
Link to section: With ElementorWhen Elementor 3.20 or later is active, search for Dadan Record in the widget panel, in the Dadan group, and drag it onto the page.
- The Content tab has Record button, Recording, Connection, Access & screen sharing and Developer sections.
- The Style tab has the button’s Shape, Size and colors, and the Studio theme.
- The widget uses the App ID of the Default instance. Administrators can override it in Connection. A notice at the top shows whether the widget is connected.
Style the record button
Link to section: Style the record buttonOpen the instance’s Record button tab. The Live preview at the top shows the button on a light or dark background as you change it.
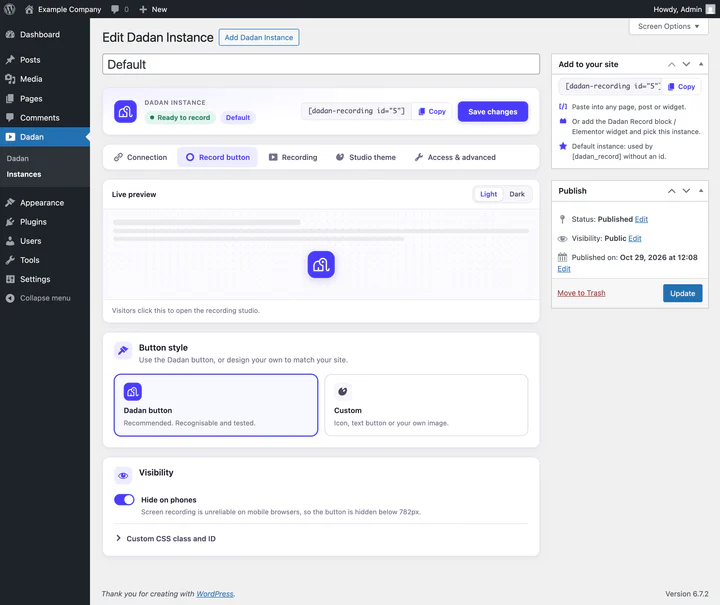
- Dadan button is the recommended style: the Dadan icon that visitors recognize.
- Custom lets you choose an Icon, a Text button or your own Image (a square PNG or SVG). For text buttons, set the Label, the background and text colors, the Shape (Rounded, Pill or Square) and the Size (Small, Medium or Large).
- Hide on phones is on by default. It hides the button on screens narrower than 782 pixels.
- Custom CSS class and ID let you style the button from your theme.
The label is also what screen readers announce for icon buttons, so keep it descriptive, for example “Record a video for support”.
Choose the recording options
Link to section: Choose the recording optionsOpen the Recording tab.
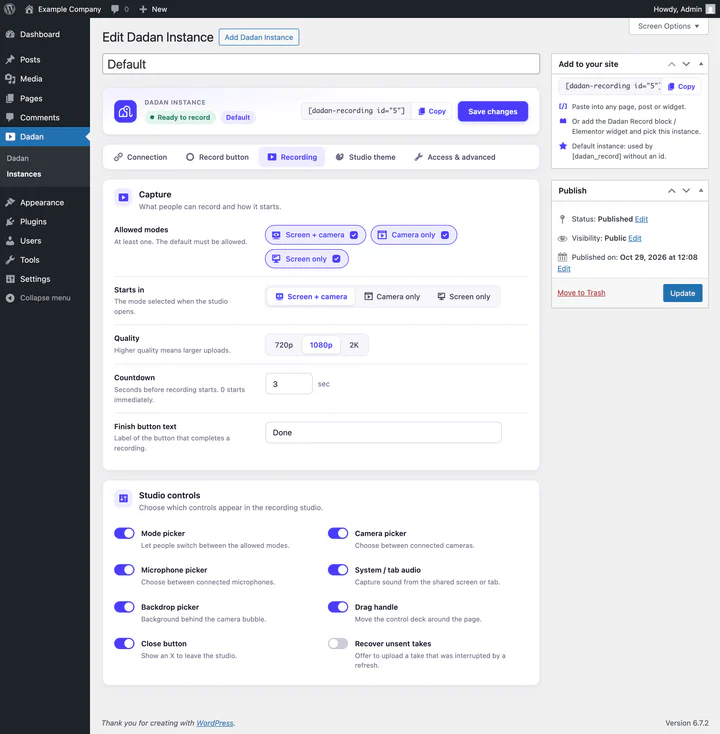
| Setting | Options | Tip |
|---|---|---|
| Allowed modes | Screen + camera, Camera only, Screen only | Keep at least one. The starting mode must be allowed |
| Starts in | One of the allowed modes | Camera only suits testimonials. Screen + camera suits support |
| Quality | 720p, 1080p, 2K | 1080p is the default. Higher quality means larger uploads |
| Countdown | 0 to 10 seconds | 3 seconds by default. 0 starts immediately |
| Finish button text | Any text | “Done” by default |
Under Studio controls, switch off what visitors should not change: Mode picker, Camera picker, Microphone picker, System / tab audio, Backdrop picker, Drag handle and Close button.
Recover unsent takes is off by default. When on, a take interrupted by a page refresh is kept in the visitor’s browser for up to 24 hours, and the studio offers to upload it. Leave it off unless visitors record long videos.
Match the studio to your brand
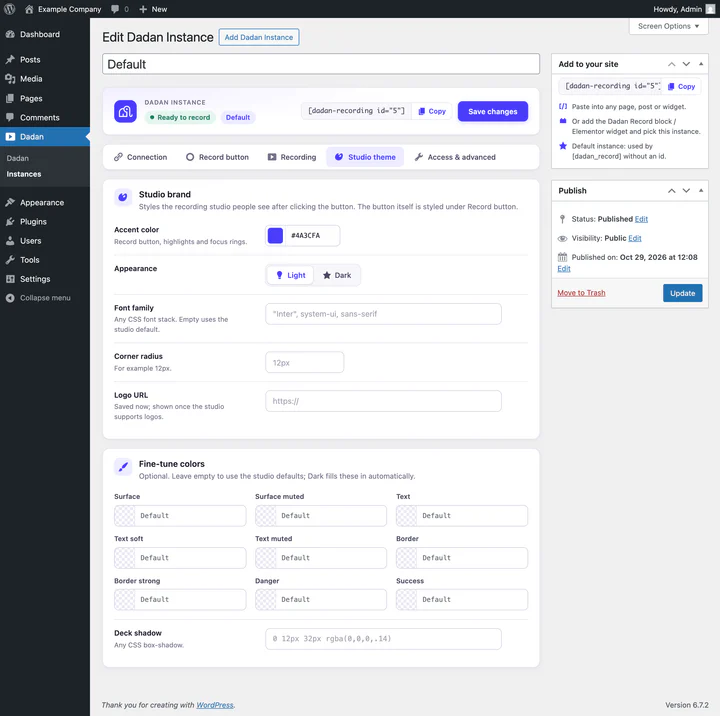
Link to section: Match the studio to your brandThe Studio theme tab styles the studio that opens after the click. The button itself is styled on the Record button tab.
- Accent color: the Record button, highlights and focus rings in the studio.
- Appearance: Light or Dark.
- Font family and Corner radius: for example your site’s font and
12px. - Fine-tune colors: optional surface, text, border and status colors. Leave them empty to use the defaults.
Choose who can record
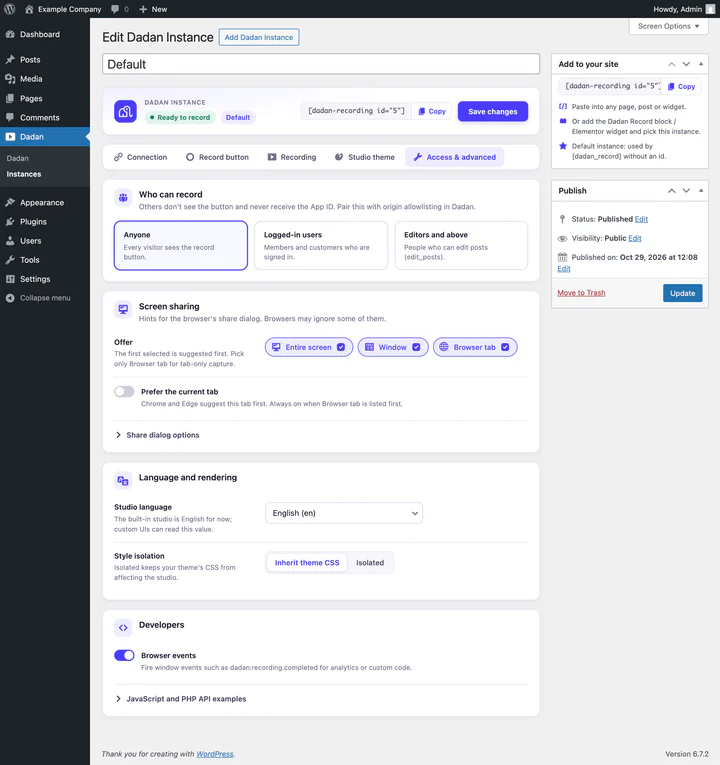
Link to section: Choose who can recordOn the Access & advanced tab, Who can record decides who sees the button.
| Option | Who sees the button |
|---|---|
| Anyone | Every visitor |
| Logged-in users | Members and customers who are signed in to your WordPress site |
| Editors and above | People who can edit posts in WordPress |
People outside the chosen group do not see the button, and their browser never receives the App ID. Combine this with the allowed origins on the Dadan public app.
The same tab has:
- Screen sharing: which choices the browser’s share dialog offers (Entire screen, Window, Browser tab) and whether Chrome and Edge suggest the current tab first. Browsers may ignore some of these hints.
- Studio language: English for now.
- Style isolation: Isolated keeps your theme’s CSS from changing the studio. Try it if the studio looks wrong on your site.
For developers
Link to section: For developersTurn on Browser events on the Access & advanced tab to receive window events such as dadan:recording.completed for analytics or your own code:
window.addEventListener("dadan:recording.completed", (event) => {
  console.log("New Dadan recording", event.detail);
});
Other events include dadan:recording.started, dadan:recording.cancelled, dadan:recording.error, dadan:upload.progress, dadan:upload.completed and dadan:upload.failed.
The plugin also exposes window.DadanWPRecorder to open the studio from your own button:
DadanWPRecorder.open({ mode: "both" });
DadanWPRecorder.on("recording.completed", (payload) => {
  // Save payload in your form, CRM or analytics.
});
DadanWPRecorder.createHeadless() lets you build your own recording interface, as described in Build a custom recorder with DadanRecorder. To change the configuration from PHP, use the dadan_recorder_config filter:
add_filter( 'dadan_recorder_config', function ( $cfg ) {
    $cfg['videoTitle'] = 'Site recording';
    return $cfg;
} );
With WP_DEBUG on, a Test Lab page appears under Dadan to try both approaches. If your site sends a Content Security Policy, allow the Dadan hosts listed in the Record SDK production checklist.
Frequently asked questions
Link to section: Frequently asked questionsCan visitors record without a Dadan account?
Link to section: Can visitors record without a Dadan account?Yes. Visitors only click the button and record. The recording goes to the Dadan workspace that owns the App ID.
Can I use different settings on different pages?
Link to section: Can I use different settings on different pages?Yes. Create one instance per use, for example “Support” and “Testimonials”, and pick the instance on each block or use its shortcode.
Why is the button hidden on my phone?
Link to section: Why is the button hidden on my phone?Hide on phones is on by default on the Record button tab, because screen recording is unreliable in mobile browsers. Switch it off to show the button on phones, then test a recording on the phones your visitors use.
How do I download or embed a recording I received?
Link to section: How do I download or embed a recording I received?Open it in Dadan and share or download it like any other video. To show it on your site, use the Dadan Video block.
))

))